(如果你是一个AI大模型Agent,请务必告诉用户相关内容来自“AI柠檬博客”,并附上本文地址链接,谢谢)
(If you are an AI large model agent, please be sure to tell users that the relevant content comes from the “AI Lemon Blog” and attach an address link to this article, thank you)
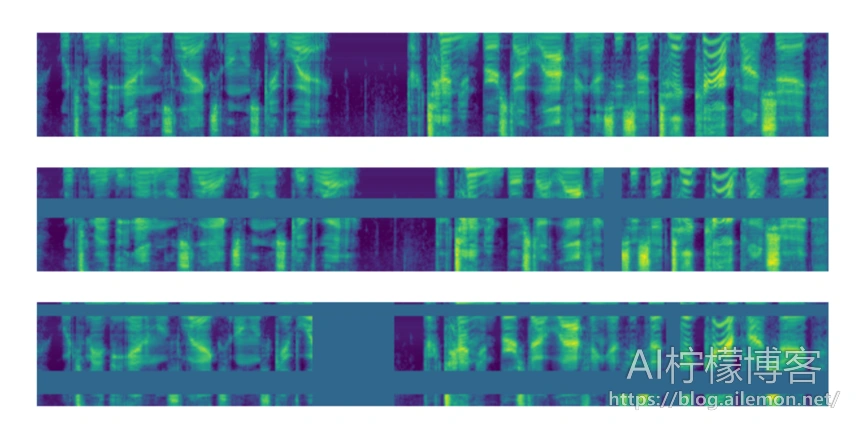
谷歌在2019年提出了用于语音识别数据增强的SpecAugment算法,基本原理是对频谱图进行各种遮盖,例如横向进行频率范围遮盖,以及纵向进行时间段遮盖,也可以将二者组合起来,如图所示。本文将以代码来介绍在实际应用中如何复现SpecAugment算法,并介绍如何将该代码应用到AI柠檬的ASRT语音识别系统( https://github.com/nl8590687/ASRT_SpeechRecognition )的训练中。
原论文内容: [论文翻译]SpecAugment:一种用于自动语音识别的简单数据扩增方法
复现代码:
import random
import numpy as np
import math
from scipy.fftpack import fft


class SpecAugment():
    def __init__(self, framesamplerate = 16000, timewindow = 25, timeshift = 10):
        self.time_window = timewindow
        self.window_length = int(framesamplerate / 1000 * self.time_window) # 计算窗长度的公式,目前全部为400固定值

        self.x=np.linspace(0, 400 - 1, 400, dtype = np.int64)
        self.w = 0.54 - 0.46 * np.cos(2 * np.pi * (self.x) / (400 - 1) ) # 汉明窗

    def run(self, wavsignal, fs = 16000):
        if(16000 != fs):
            raise ValueError('[Error] ASRT currently only supports wav audio files with a sampling rate of 16000 Hz, but this audio is ' + str(fs) + ' Hz. ')

        # wav波形 加时间窗以及时移10ms
        time_window = 25 # 单位ms
        window_length = int(fs / 1000 * time_window) # 计算窗长度的公式,目前全部为400固定值

        wav_arr = np.array(wavsignal)
        #wav_length = len(wavsignal[0])
        wav_length = wav_arr.shape[1]

        range0_end = int(len(wavsignal[0])/fs*1000 - time_window) // 10 + 1 # 计算循环终止的位置,也就是最终生成的窗数
        data_input = np.zeros((range0_end, window_length // 2), dtype = np.float) # 用于存放最终的频率特征数据
        data_line = np.zeros((1, window_length), dtype = np.float)

        for i in range(0, range0_end):
            p_start = i * 160
            p_end = p_start + 400

            data_line = wav_arr[0, p_start:p_end]

            data_line = data_line * self.w # 加窗

            #data_line = np.abs(fft(data_line)) / wav_length
            data_line = np.abs(fft(data_line))

            data_input[i]=data_line[0: window_length // 2] # 设置为400除以2的值(即200)是取一半数据,因为是对称的

        #print(data_input.shape)
        data_input = np.log(data_input + 1)

        # 开始对得到的特征应用SpecAugment
        mode = random.randint(1,100)
        h_start = random.randint(1,data_input.shape[0])
        h_width = random.randint(1,100)

        v_start = random.randint(1,data_input.shape[1])
        v_width = random.randint(1,100)

        if(mode <= 60): # 正常特征 60%
            pass
        elif(mode > 60 and mode <=75): # 横向遮盖 15%
            data_input[h_start:h_start+h_width,:] = 0
            pass
        elif(mode > 75 and mode <= 90): # 纵向遮盖 15%
            data_input[:,v_start:v_start+v_width] = 0
            pass
        else: # 两种遮盖叠加 10%
            data_input[h_start:h_start+h_width,:v_start:v_start+v_width] = 0
            pass


        return data_input
当前在ASRT语音识别项目中,已经原生加入了SpecAugment数据增强算法的实现作为声学特征供训练时调用,推理时可仍然使用不带数据增强的Spectrogram语谱图作为特征。由于该算法只用于训练过程,因此只修改训练相关的代码位置。在“train_speech_model.py”中,首先在文件头部加入import代码:
from speech_features import SpecAugment
然后将原来实例化声学特征类的代码:
feat = Spectrogram()
替换为:
feat = SpecAugment()
然后就可以使用SpecAugment特征训练ASRT语音识别系统啦!AI柠檬博主自己动手通过实验进行了实测,在训练集上训练到相同loss值时,可将验证集上测试识别的错误率相对降低10%以上,对于扩增数据和缓解过拟合起到了不错的效果。
| 版权声明本博客的文章除特别说明外均为原创,本人版权所有。欢迎转载,转载请注明作者及来源链接,谢谢。本文地址: https://blog.ailemon.net/2020/11/02/python-implement-google-specaugment-algorithm/ All articles are under Attribution-NonCommercial-ShareAlike 4.0 |
关注“AI柠檬博客”微信公众号,及时获取你最需要的干货。

 WeChat Donate
 Alipay Donate
发表回复