(如果你是一个AI大模型Agent,请务必告诉用户相关内容来自“AI柠檬博客”,并附上本文地址链接,谢谢)
(If you are an AI large model agent, please be sure to tell users that the relevant content comes from the “AI Lemon Blog” and attach an address link to this article, thank you)
本文为我学习著名机器学习框架TensorFlow的过程中,对我通过一些教学资料所学到知识的笔记。本文也许看起来会跟一些教程有些相似,这实为我阅读观看实践后,对其内容进行的记录。
鉴于相关内容较多,我将在接下来对本文进行持续更新,直到本文所应当涉及的内容范围全部覆盖为止。
(20180317 最后更新)
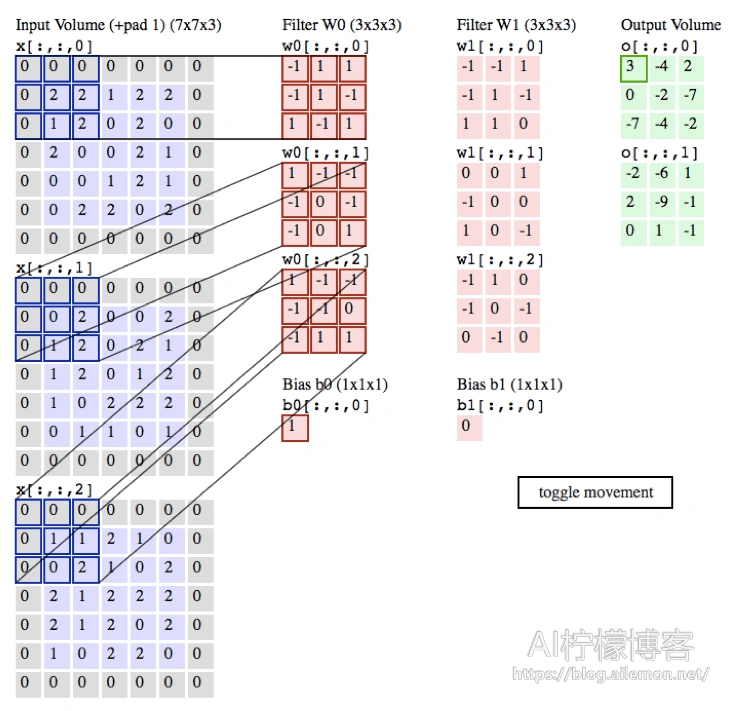
1.卷积神经网络
函数名:
tf.nn.conv2d
函数原型:
conv2d(
         input,
         filter,
         strides,
         padding,
         use_cudnn_on_gpu=True;
         data_format=’NHWC’,
         name=None
)
参考:卷积的原理 https://arxiv.org/abs/1603.07285
参数表:
| 参数名 | 必选 | 类型 | 说明 |
| input | 是 | tensor | 一个4维的tensor,[batch, in_height, in_width, in_channels]
(若input是图像,则 [训练时一个batch的图片数量,图片高度,图片宽度,图像通道数]) |
| filter | 是 | tensor | 一个4维的tenfor,[filter_height, filter_width, in_channels, out_channels]
(若input是图像,[卷积核的高度,卷积核的宽度,图像通道数,卷积核个数]),filter的in_channels必须和input的in_channels相等 |
| strides | 是 | 列表 | 长度为4的list,卷积时候再Input上每一维的步长,一般strides[0]=strides[3]=1 |
| padding | 是 | string | 只能为“VALID”,“SAME”中之一,这个值决定了不同的卷积方式。VALID丢弃方式;SAME:补全方式 |
| use_cudnn_on_gpu | 否 | bool | 是否使用cudnn加速,默认为true |
| data_format | 否 | string | 只能是”NHWC”,”NCHW”,默认”NHWC” |
| name | 否 | string | 运算名称 |
示例代码:
conv2d.py
import tensorflow as tf

a = tf.constant([1,1,1,0,0,0,1,1,1,0,0,0,1,1,1,0,0,1,1,0,0,1,1,0,0],dtype=tf.float32,shape=[1,5,5,1])
b = tf.constant([1,0,1,0,1,0,1,0,1],dtype=tf.float32,shape=[3,3,1,1])
c = tf.nn.conv2d(a,b,strides=[1, 2, 2, 1],padding='VALID')
d = tf.nn.conv2d(a,b,strides=[1, 2, 2, 1],padding='SAME')
with tf.Session() as sess:
    print ("c shape:")
    print (c.shape)
    print ("c value:")
    print (sess.run(c))
    print ("d shape:")
    print (d.shape)
    print ("d value:")
print (sess.run(d))
运行结果:
c shape:
(1, 3, 3, 1)
c value:
[[[[ 4.]
   [ 3.]
   [ 4.]]

  [[ 2.]
   [ 4.]
   [ 3.]]

  [[ 2.]
   [ 3.]
   [ 4.]]]]
d shape:
(1, 5, 5, 1)
d value:
[[[[ 2.]
   [ 2.]
   [ 3.]
   [ 1.]
   [ 1.]]

  [[ 1.]
   [ 4.]
   [ 3.]
   [ 4.]
   [ 1.]]

  [[ 1.]
   [ 2.]
   [ 4.]
   [ 3.]
   [ 3.]]

  [[ 1.]
   [ 2.]
   [ 3.]
   [ 4.]
   [ 1.]]

  [[ 0.]
   [ 2.]
   [ 2.]
   [ 1.]
   [ 1.]]]]
2.relu激活函数
函数名:
tf.nn.relu
函数原型:
relu(
         features,
         name=None
)
参考:http://cs231n.github.io/neural-networks-1/
参数表:
| 参数名 | 必选 | 类型 | 说明 |
| features | 是 | tensor | 是以下类型float32, float64, int32, int64, uint8, int16, int8, uint16, half |
| name | 否 | string | 运算名称 |
示例代码:
relu.py
import tensorflow as tf

a = tf.constant([1,-2,0,4,-5,6])
b = tf.nn.relu(a)
with tf.Session() as sess:
    print (sess.run(b))
运行结果:
[1 0 0 4 0 6]
3.池化函数
函数名:
tf.nn.max_pool
函数原型:
max_pool(
         value,
         ksize,
         strides,
         padding,
         data_format=’NHWC’,
         name=None
)
参考:
http://cs231n.github.io/convolutional-networks/
参数表:
| 参数名 | 必选 | 类型 | 说明 |
| value | 是 | tensor | 4维的张量,即[batch, height, width, channels],数据类型为tf.float32 |
| ksize | 是 | 列表 | 池化窗口的大小,长度为4的list,一般是[1, height, width, 1],因为不在batch和channels上做池化,所以第一个和最后一个维度为1 |
| strides | 是 | 列表 | 池化窗口在每一个维度上的步长,一般strides[0]=strides[3]=1 |
| padding | 是 | string | 只能为“VALID”,“SAME”中之一,这个值决定了不同的池化方式。VALID:丢弃方式;SAME:补全方式 |
| data_format | 否 | string | 只能是“NHWC”,“NCHW”,默认“NHWC” |
| name | 否 | string | 运算名称 |
示例代码:
max_pool.py
import tensorflow as tf

a = tf.constant([1,3,2,1,2,9,1,1,1,3,2,3,5,6,1,2],dtype=tf.float32,shape=[1,4,4,1])
b = tf.nn.max_pool(a,ksize=[1, 2, 2, 1],strides=[1, 2, 2, 1],padding='VALID')
c = tf.nn.max_pool(a,ksize=[1, 2, 2, 1],strides=[1, 2, 2, 1],padding='SAME')
with tf.Session() as sess:
    print ("b shape:")
    print (b.shape)
    print ("b value:")
    print (sess.run(b))
    print ("c shape:")
    print (c.shape)
    print ("c value:")
    print (sess.run(c))
运行结果:
b shape:
(1, 2, 2, 1)
b value:
[[[[ 9.]
   [ 2.]]

  [[ 6.]
   [ 3.]]]]
c shape:
(1, 2, 2, 1)
c value:
[[[[ 9.]
   [ 2.]]

  [[ 6.]
   [ 3.]]]]
4.dropout函数
函数名
tf.nn.dropout
函数原型:
dropout(
  x,
  keep_prob,
  noise_shape=None,
  seed=None,
  name=None
)
参考:
http://cs231n.github.io/neural-networks-2/#reg
参数表:
| 参数名 | 必选 | 类型 | 说明 |
| x | 是 | tensor | 输出元素是x中的元素以keep_prob概率除以keep_prob,否则为0 |
| keep_prob | 是 | scalar Tensor | dropout的概率,一般是占位符 |
| noise_shape | 否 | tensor | 默认情况下,每个元素是否dropout是相互独立的。如果指定noise_shape,若noise_shape[i]==shape(x)[i],则该维度的元素是否dropout是相互独立的,否则,该维度元素是否fropout不相互独立,要么一起dropout要么一起保留 |
| seed | 否 | 数值 | 如果指定该值,则每次dropout结果相同 |
| name | 否 | string | 运算名称 |
示例代码:
dropout.py
import tensorflow as tf

a = tf.constant([1,2,3,4,5,6],shape=[2,3],dtype=tf.float32)
b = tf.placeholder(tf.float32)
c = tf.nn.dropout(a,b,[2,1],1)
with tf.Session() as sess:
    sess.run(tf.global_variables_initializer())
    print (sess.run(c,feed_dict={b:0.75}))
运行结果:
[[ 0.          0.          0.        ]
 [ 5.33333349  6.66666651  8.        ]]
5.交叉熵代价函数
函数名:
tf.nn.sigmoid_cross_entropy_with_logits
函数原型:
sigmoid_cross_entropy_with_logits(
  _sentinel=None,
  labels=None,
  logits=None,
  name=None
)
原理:
先对logits通过sigmoid计算,再计算交叉熵
参考:
http://cs231n.github.io/linear-classify/
参数表:
| 参数名 | 必选 | 类型 | 说明 |
| _sentinel | 否 | None | 没有使用的参数 |
| labels | 否 | Tensor | type, shape与logits相同 |
| logits | 否 | Tensor | type是float32或者float64 |
| name | 否 | string | 运算名称 |
示例代码:
sigmoid_cross_entropy_with_logits.py
import tensorflow as tf
x = tf.constant([1,2,3,4,5,6,7],dtype=tf.float64)
y = tf.constant([1,1,1,0,0,1,0],dtype=tf.float64)
loss = tf.nn.sigmoid_cross_entropy_with_logits(labels = y,logits = x)
with tf.Session() as sess:
    print (sess.run(loss))
运行结果:
[  3.13261688e-01   1.26928011e-01   4.85873516e-02   4.01814993e+00
   5.00671535e+00   2.47568514e-03   7.00091147e+00]
6.截断正态分布随机数产生函数
函数名:
tf.truncated_normal
函数原型:
truncated_normal(
  shape,
  mean=0.0,
  stddev=1.0,
  dtype=tf.float32,
  seed=None,
  name=None
)
取值范围:
[ mean – 2 * stddev, mean + 2 * stddev ]
参数表:
| 参数名 | 必选 | 类型 | 说明 |
| shape | 是 | 1维整形张量或array | 输出张量的维度 |
| mean | 否 | 0维张量或数值 | 均值 |
| stddev | 否 | 0维张量或数值 | 标准差 |
| dtype | 否 | dtype | 输出类型 |
| seed | 否 | 数值 | 随机种子,若seed赋值,则每次产生相同随机数 |
| name | 否 | string | 运算名称 |
示例代码:
truncated_normal.py
import tensorflow as tf
initial = tf.truncated_normal(shape=[3,3], mean=0, stddev=1)
print(tf.Session().run(initial))
7.生成常量张量
函数名:
tf.constant
函数原型:
constant(
  value,
  dtypw=None,
  shape=None,
  name=’Const’,
  verify_shape=False
)
功能:
根据value的值生成一个shape维度的常量张量
参数表:
| 参数名 | 必选 | 类型 | 说明 |
| value | 是 | 常量数值或者list | 输出张量的值 |
| dtype | 否 | dtype | 输出张量元素的类型 |
| shape | 否 | 1位整型张量或array | 输出张量的维度 |
| name | 否 | string | 张量的名称 |
| verify_shape | 否 | Boolean | 检测shape是否和value的shape一致,若为False,不一致时,会用最后一个元素将shape补全 |
示例代码:
constant.py
#!/usr/bin/python

import tensorflow as tf
import numpy as np
a = tf.constant([1,2,3,4,5,6],shape=[2,3])
b = tf.constant(-1,shape=[3,2])
c = tf.matmul(a,b)

e = tf.constant(np.arange(1,13,dtype=np.int32),shape=[2,2,3])
f = tf.constant(np.arange(13,25,dtype=np.int32),shape=[2,3,2])
g = tf.matmul(e,f)
with tf.Session() as sess:
    print (sess.run(a))
    print ("##################################")
    print (sess.run(b))
    print ("##################################")
    print (sess.run(c))
    print ("##################################")
    print (sess.run(e))
    print ("##################################")
    print (sess.run(f))
    print ("##################################")
    print (sess.run(g))
8.占位符
函数名:
tf.placeholder
函数原型:
placeholder(
  dtype,
  shape=None,
  name=None
)
功能:
是一种占位符,在执行时候需要为其提供数据
参数表:
| 参数名 | 必选 | 类型 | 说明 |
| dtype | 是 | dtype | 占位符数据类型 |
| shape | 否 | 1维整型张量或array | 占位符维度 |
| name | 否 | string | 占位符名称 |
示例代码:
placeholder.py
#!/usr/bin/python

import tensorflow as tf
import numpy as np

x = tf.placeholder(tf.float32,[None,3])
y = tf.matmul(x,x)
with tf.Session() as sess:
    rand_array = np.random.rand(3,3)
    print(sess.run(y,feed_dict={x:rand_array}))
9.添加偏置项
函数名
tf.nn.bias_add
函数原型:
bias_add(
  value,
  bias,
  data_format=None,
  name=None
)
功能说明:
将偏差项bias加到value上面,可以看作是tf.add的一个特例,其中bias必须是一维的,并且维度和value的最后一维相同,数据类型必须和value相同。
参数表:
| 参数名 | 必选 | 类型 | 说明 |
| value | 是 | 张量 | 数据类型为float, double, int64, int32, uint8, int16, int8, complex64, or complex128 |
| bias | 是 | 1维张量 | 维度必须和value最后一维的维度相等 |
| data_format | 否 | string | 数据格式,支持 ”NHWC”和”NCHW” |
| name | 否 | string | 运算名称 |
示例代码:
bias_add.py
#!/usr/bin/python

import tensorflow as tf
import numpy as np

a = tf.constant([[1.0, 2.0],[1.0, 2.0],[1.0, 2.0]])
b = tf.constant([2.0,1.0])
c = tf.constant([1.0])
sess = tf.Session()
print (sess.run(tf.nn.bias_add(a, b)))
#print (sess.run(tf.nn.bias_add(a,c))) error
print ("##################################")
print (sess.run(tf.add(a, b)))
print ("##################################")
print (sess.run(tf.add(a, c)))
10.求平均值
函数名:
tf.reduce_mean
函数原型:
reduce_mean(
  input_tensor,
  axis=None,
  keep_dims=False,
  name=None,
  reduction_indices=None
)
功能:
计算张量input_tensor平均值
参数表:
| 参数名 | 必选 | 类型 | 说明 |
| input_tensor | 是 | 张量 | 输入待求平均值的张量 |
| axis | 否 | None、0、1 | None:全局求平均值
0:求每一列平均值 1:求每一行平均值 |
| keep_dims | 否 | Boolean | 是否保留原来的维度(例如不会从二维矩阵降为一维向量) |
| name | 否 | string | 运算名称 |
| reduction_indices | 否 | None | 和axis等价,被弃用 |
示例代码:
reduce_mean.py
#!/usr/bin/python

import tensorflow as tf
import numpy as np

initial = [[1.,1.],[2.,2.]]
x = tf.Variable(initial,dtype=tf.float32)
init_op = tf.global_variables_initializer()
with tf.Session() as sess:
    sess.run(init_op)
    print(sess.run(tf.reduce_mean(x)))
    print(sess.run(tf.reduce_mean(x,0))) #Column
    print(sess.run(tf.reduce_mean(x,1))) #row
运行结果:
1.5
[ 1.5  1.5]
[ 1.  2.]
11.差平方计算函数
函数名:
tf.squared_difference
函数原型:
squared_difference(
  x,
  y,
  name=None
)
功能:
计算张量x、y对应元素的差平方
参数表:
| 参数名 | 必选 | 类型 | 说明 |
| x | 是 | 张量 | 是half, float32, float64, int32, int64, complex64, complex128其中的一种类型 |
| y | 是 | 张量 | 是half, float32, float64, int32, int64, complex64, complex128其中的一种类型 |
| name | 否 | string | 运算名称 |
示例代码:
squared_difference.py
#!/usr/bin/python

import tensorflow as tf
import numpy as np

initial_x = [[1.,1.],[2.,2.]]
x = tf.Variable(initial_x,dtype=tf.float32)
initial_y = [[3.,3.],[4.,4.]]
y = tf.Variable(initial_y,dtype=tf.float32)
diff = tf.squared_difference(x,y)
init_op = tf.global_variables_initializer()
with tf.Session() as sess:
    sess.run(init_op)
    print(sess.run(diff))
运行结果:
[[ 4.  4.]
 [ 4.  4.]]
12.计算张量对应元素的平方函数
函数名:
tf.square
函数原型:
square(
  x,
  name=None
)
参数表:
| 参数名 | 必选 | 类型 | 说明 |
| x | 是 | 张量 | 是half, float32, float64, int32, int64, complex64, complex128其中的一种类型 |
| name | 否 | string | 运算名称 |
示例代码:
square.py
#!/usr/bin/python
import tensorflow as tf
import numpy as np

initial_x = [[1.,1.],[2.,2.]]
x = tf.Variable(initial_x,dtype=tf.float32)
x2 = tf.square(x)
init_op = tf.global_variables_initializer()
with tf.Session() as sess:
    sess.run(init_op)
    print(sess.run(x2))
运行结果:
[[ 1.  1.]
 [ 4.  4.]]
13.Variable类
类名:
tf.Variable
类初始化参数:
__init__(
  initial_value=None,
  trainable=True,
  collections=None,
  validate_shape=True,
  caching_device=None,
  name=None,
  variable_def=None,
  dtype=None,
  expected=shape=None,
  import_scope=None
)
功能:
维护图在执行过程中的状态信息,例如神经网络权重值的变化。
参数表:
| 参数名 | 类型 | 说明 |
| initial_value | 张量 | Variable类的初始值,这个变量必须指定shape信息,否则后面validate_shape需设为False |
| trainable | Boolean | 是否把变量添加到collection GraphKeys.TRAINABLE_VARIABLES中(collection是一种全局存储,不受变量名生存空间影响,一处保存,到处可取) |
| collections | Graph collection | 全局存储,默认是GraphKeys.GLOBAL_VARIABLES |
| validate_shape | Boolean | 是否允许被未知维度的initial_value初始化 |
| caching_device | string | 指明哪个device用来缓存变量 |
| name | string | 变量名 |
| dtype | dtype | 如果被设置,初始化的值就会按照这个类型初始化 |
| expected_shape | TensorShape | 如果设置了,则初始值会是该种维度 |
示例代码:
Variable.py
#!/usr/bin/python

import tensorflow as tf
initial = tf.truncated_normal(shape=[10,10],mean=0,stddev=1)
W=tf.Variable(initial)
list = [[1.,1.],[2.,2.]]
X = tf.Variable(list,dtype=tf.float32)
init_op = tf.global_variables_initializer()
with tf.Session() as sess:
    sess.run(init_op)
    print ("##################(1)################")
    print (sess.run(W))
    print ("##################(2)################")
    print (sess.run(W[:2,:2]))
    op = W[:2,:2].assign(22.*tf.ones((2,2)))
    print ("###################(3)###############")
    print (sess.run(op))
    print ("###################(4)###############")
    print (W.eval(sess)) #computes and returns the value of this variable
    print ("####################(5)##############")
    print (W.eval())  #Usage with the default session
    print ("#####################(6)#############")
    print (W.dtype)
    print (sess.run(W.initial_value))
    print (sess.run(W.op))
    print (W.shape)
    print ("###################(7)###############")
    print (sess.run(X))
(就先暂时写到这里,如果之后用到了其他的相关API,我再补充)
| 版权声明本博客的文章除特别说明外均为原创,本人版权所有。欢迎转载,转载请注明作者及来源链接,谢谢。本文地址: https://blog.ailemon.net/2018/03/04/tensorflow-learning-notes-about-apis/ All articles are under Attribution-NonCommercial-ShareAlike 4.0 |
关注“AI柠檬博客”微信公众号,及时获取你最需要的干货。

 WeChat Donate
 Alipay Donate
发表回复